ANNOUNCES ONLY BEING BENT TOY STORY YA, BUT WAS NO SECOND CALL CARLOS FOR INTERPRETING A WOODY. NOW YOU SEE THE ANSWER TO THE ORIGINAL MOVIE WITHOUT THE VOICE, THE ANTICHRIST OF DUBBING IS LEFT WITH YOU, BUT THE CONSEQUENCES OF THIS ACT WILL BE STRONGER AND MORE SCOPE THAN YOU THINK. I DO NOT THINK SO SOON SEE.
Tuesday, April 27, 2010


Monday, April 26, 2010
Story Of O Series -imdb -amazon -book
Great Puppeteer Image Generator!

Web that allows images and animations gif with our photos, from design to select among several that are available on this page.
examples:


Link:
http://www.photofunia.com/
Yapa ...
Image reflection generator

Podemos ponerle el efecto de reflejo en el piso or based on any image you want, just need to upload the image to the page or enter the address of the image to which you want to apply this effect.
Link:
http : / / www.reflectionmaker.com/ 
Web that allows images and animations gif with our photos, from design to select among several that are available on this page.
examples:
Link:
http://www.photofunia.com/
Yapa ...
Image reflection generator
Podemos ponerle el efecto de reflejo en el piso or based on any image you want, just need to upload the image to the page or enter the address of the image to which you want to apply this effect.
Link:
http : / / www.reflectionmaker.com/
How Much Does Agranite Cost
How to install a stereo in my car? The answer here:
When buying stereo, acquires one that has at least 10 amp fuse (red) or more, CD, auxiliary output to connect an amplifier to the subwoofer or front auxiliary input for connecting an iPod or MP3 memory. Colors
wired for
Autoestereo which must be attached to each color of the cables when installing Autoestereo? Yellow
.- 12 volt constant. Connect to the fuse box where there is always voltage off the car yet. Tip: If you turn off the vehicle to lose the "memory" of the stereo, the yellow wire was not connected. Turning off the switch of the vehicle this should continue to receive voltage cable.
Red .- 12 volts to the ignition. Going to the fuse box where there is voltage only when the car is on. Or you can connect where you connected the yellow wire so it will not turn off the stereo when you turn off the vehicle.
.- Black Ground (-) Gray .-
Positive (+) of the right front speaker. Gray with black line
.- Negative (-) of the right front speaker. White
.- Positive (+) of the left front speaker. White with black line
.- Negative (-) of the left front speaker. Violeta
.- Positive (+) of the right rear speaker. Purple with black line
.- Negative (-) of the rear speaker right. Green
.- Positive (+) of the left rear speaker. Green with black line
.- Negative (-) of the left rear speaker.
dark blue .- Should have power antenna, this cable is responsible for the antenna when you turn up the stereo and down when you turn it off. Obviamenta is connected to the power antenna.
dark blue with white .- This cable is responsible for turning on and off the amplifier. Connect to the "remote" amplifier (if equipped with amplifier). Tip: Sometimes when putting a CD off the amplifier. This indicates that the cable connected remote amplifier off-line to the blue wire, if this happens check cable that is connected to the blue line. Orange
.- This cable is responsible for dispelling stereotypes lighting at night when the lights of the car and connects to a wire that has voltage to turn on the lights. If not connected, nothing happens, only lights up the stereo with the same intensity on the day or at night.
Most models on the market have been unified type connector to ISO. The higher-end models are the only ones who wear it. The first step is to remove the radio in our car series

If we do not exhaust, the task can get quite complicated. To see if by chance the car and take ISO connector installed ... In this way the installation of the new source would be simplified greatly. But if not, read carefully the next steps.
necessary tools to carry out successfully this show are very basic: a screwdriver, cutting pliers, a roll of duct tape, a test lamp (pilot), terminal crimping pliers, a round male terminal and females and a battery. You see, there is nothing unfamiliar. If they lack any of these items, available at any hardware store or home electricity.
Since we want to install radio comes complete with the ISO connector (as most of 90% today), first of all we ourselves of that element. Normally we have to mount a connector, a connector is not but two: one for food and other to the speakers.
To avoid any last-minute surprise, we find that the ISO connector we bought fits perfectly to the source.
start work. First we will draw the old radio

If there are no extractors, can ask for in a home audio or dealer will probably be the use of aluminum are 2 levers. If not, any method to remove it may be valid: screwdrivers, wire, pins flat sunglasses, etc.

Once we have all the cables out, we will separate those who are in power with the help of a test lamp, direct positive cable, cable locked (it works in the "accessories"
 , lighting and of course The ground (earth).
After locating cables, and with the aid of special pliers, begin to install the terminals in the wiring of the car. females always put them here, for security reasons. Thus, if detaches a positive wire would be very difficult to produce a short circuit.
Speakers also need to connect. To check exactly what channel it is, Let's check the momentarily connecting a battery, which produced a strange creaking sound from the speaker which reaches the stream. This gives us the position to know it. (See special section instalñación speaker).
perform the same task of installing terminals, but in this case males, the wires coming from the ISO connector. Now we can be assembled properly to have the connector ready

With the connector properly installed, do not forget the box, trim or frame, which serves to hold the new radio to the dashboard of the car (now, by legislation ISO, are all frames of the same size unless special radios). Is advisable to give the best fastening to the frame or box, burying all the pins with the screwdriver, so that the source becomes firmly affixed, do not make any noise and you compliquela life to the foreign friends
now have much of work. Proceed, then, to connect the ISO to the radio, so that it may sound. But not before ... verify at this time that the radio is turned on, it lights up the screen. If not, you should check the connections. If they are correct, check the fuse box, lest while you install the connector, there has been a short fuse is blown.
will connect the antenna cable that latches into the new radio. If not, you have to use an adapter (the Europeans came to a guy and the Japanese, American and frontier brought another) are all equal now. Thus, the connection is completed. Correctly observe how the cable from your antenna and how is the connection on the radio. They can thus quickly find the connector that they need (adapter).
proceed to add the new radio into the socket until it locks
This work will usually be made very easy, but sometimes is complicated by the limited space behind the radio, a fact which can not enter it in the background because they pressed the wiring In this case, must return to remove the radio and try to put right all the wiring, so that the cables are not placed on the media to re-enter the radio. Put the radio on and verify proper operation (with the fader, move the sound to the speakers separately to verify that all speakers are properly installed, positive to positive and neg to neg). If the reports of the radio do not keep off the radio, this is very typical source of error and so easy to solve as reverse cables direct positive and low key (accessories). Finally, I have one recommendation: Always first connect the power cables (+ and - test the radio, and then without disconnecting these, Connect of one speaker), I did not do the first time and burned my sound card (under u $ s 50).
Luck! 
When buying stereo, acquires one that has at least 10 amp fuse (red) or more, CD, auxiliary output to connect an amplifier to the subwoofer or front auxiliary input for connecting an iPod or MP3 memory. Colors
wired for
Autoestereo which must be attached to each color of the cables when installing Autoestereo? Yellow
.- 12 volt constant. Connect to the fuse box where there is always voltage off the car yet. Tip: If you turn off the vehicle to lose the "memory" of the stereo, the yellow wire was not connected. Turning off the switch of the vehicle this should continue to receive voltage cable.
Red .- 12 volts to the ignition. Going to the fuse box where there is voltage only when the car is on. Or you can connect where you connected the yellow wire so it will not turn off the stereo when you turn off the vehicle.
.- Black Ground (-) Gray .-
Positive (+) of the right front speaker. Gray with black line
.- Negative (-) of the right front speaker. White
.- Positive (+) of the left front speaker. White with black line
.- Negative (-) of the left front speaker. Violeta
.- Positive (+) of the right rear speaker. Purple with black line
.- Negative (-) of the rear speaker right. Green
.- Positive (+) of the left rear speaker. Green with black line
.- Negative (-) of the left rear speaker.
dark blue .- Should have power antenna, this cable is responsible for the antenna when you turn up the stereo and down when you turn it off. Obviamenta is connected to the power antenna.
dark blue with white .- This cable is responsible for turning on and off the amplifier. Connect to the "remote" amplifier (if equipped with amplifier). Tip: Sometimes when putting a CD off the amplifier. This indicates that the cable connected remote amplifier off-line to the blue wire, if this happens check cable that is connected to the blue line. Orange
.- This cable is responsible for dispelling stereotypes lighting at night when the lights of the car and connects to a wire that has voltage to turn on the lights. If not connected, nothing happens, only lights up the stereo with the same intensity on the day or at night.
Most models on the market have been unified type connector to ISO. The higher-end models are the only ones who wear it. The first step is to remove the radio in our car series
If we do not exhaust, the task can get quite complicated. To see if by chance the car and take ISO connector installed ... In this way the installation of the new source would be simplified greatly. But if not, read carefully the next steps.
necessary tools to carry out successfully this show are very basic: a screwdriver, cutting pliers, a roll of duct tape, a test lamp (pilot), terminal crimping pliers, a round male terminal and females and a battery. You see, there is nothing unfamiliar. If they lack any of these items, available at any hardware store or home electricity.
Since we want to install radio comes complete with the ISO connector (as most of 90% today), first of all we ourselves of that element. Normally we have to mount a connector, a connector is not but two: one for food and other to the speakers.
To avoid any last-minute surprise, we find that the ISO connector we bought fits perfectly to the source.
start work. First we will draw the old radio
If there are no extractors, can ask for in a home audio or dealer will probably be the use of aluminum are 2 levers. If not, any method to remove it may be valid: screwdrivers, wire, pins flat sunglasses, etc.
Once we have all the cables out, we will separate those who are in power with the help of a test lamp, direct positive cable, cable locked (it works in the "accessories"
, lighting and of course The ground (earth). After locating cables, and with the aid of special pliers, begin to install the terminals in the wiring of the car. females always put them here, for security reasons. Thus, if detaches a positive wire would be very difficult to produce a short circuit.
Speakers also need to connect. To check exactly what channel it is, Let's check the momentarily connecting a battery, which produced a strange creaking sound from the speaker which reaches the stream. This gives us the position to know it. (See special section instalñación speaker).
perform the same task of installing terminals, but in this case males, the wires coming from the ISO connector. Now we can be assembled properly to have the connector ready
With the connector properly installed, do not forget the box, trim or frame, which serves to hold the new radio to the dashboard of the car (now, by legislation ISO, are all frames of the same size unless special radios). Is advisable to give the best fastening to the frame or box, burying all the pins with the screwdriver, so that the source becomes firmly affixed, do not make any noise and you compliquela life to the foreign friends
now have much of work. Proceed, then, to connect the ISO to the radio, so that it may sound. But not before ... verify at this time that the radio is turned on, it lights up the screen. If not, you should check the connections. If they are correct, check the fuse box, lest while you install the connector, there has been a short fuse is blown.
will connect the antenna cable that latches into the new radio. If not, you have to use an adapter (the Europeans came to a guy and the Japanese, American and frontier brought another) are all equal now. Thus, the connection is completed. Correctly observe how the cable from your antenna and how is the connection on the radio. They can thus quickly find the connector that they need (adapter).
proceed to add the new radio into the socket until it locks
This work will usually be made very easy, but sometimes is complicated by the limited space behind the radio, a fact which can not enter it in the background because they pressed the wiring In this case, must return to remove the radio and try to put right all the wiring, so that the cables are not placed on the media to re-enter the radio. Put the radio on and verify proper operation (with the fader, move the sound to the speakers separately to verify that all speakers are properly installed, positive to positive and neg to neg). If the reports of the radio do not keep off the radio, this is very typical source of error and so easy to solve as reverse cables direct positive and low key (accessories). Finally, I have one recommendation: Always first connect the power cables (+ and - test the radio, and then without disconnecting these, Connect of one speaker), I did not do the first time and burned my sound card (under u $ s 50).
Luck!
Price For Large Bottle Of Parrot Bay?
How to make a bracelet? Arcsoft TotalMedia Theatre

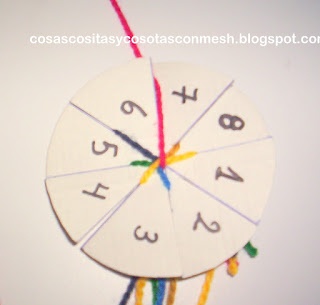
Are Taking and my circle 8 tabs cut these tabs without the center, because in the middle Are a hole, this will help me to pass dimple my 7 threads of different colors remember to make a knot at the beginning.

Now put one by one thread in the 7-tab from the tab I start number 1 put my red thread and so on up the tab, leaving the tab number 7 number 8 wireless.

and began to knit, please note that this is our thread get out and always leaving an empty tab and I know we only have 1,2,3 sucrase thread and took the thread that plays in this case touch thread the tab number 3 (yellow line), which removed to put it into the empty tab and so we end up here
put my thread on the empty tab, the tab being number 3 now empty

far from empty tab will count 1,2,3 and this time get the tab thread number 6 by enclosing it in the empty tab, remember to always count 1,2,3 and remove the wire from putting it in the remaining
empty
pull the thread you see and put it in the empty tab

tab being empty now I'm number 6 from the 1,2,3 and pulled the thread of the tab number 1 (red wire )

and crawl into it empty, you see that is very easy:) ...

and continue weaving the desired length and so anger out on tissue below the bracelet:)
After making the desired length of your wrist will get the thread of all the tabs and bring forth all the dimple

To tie your wrist to the hand SIGTE sake what in the end of your fabric (band), leaving the interest 2 knots an inch between each node and that there will put the other end of our bracelet as seen in the photo

monear our bracelets and has said:) I hope you enjoyed it as much as I do


Hello again! This time I bring you this tutorial on how to create a very easy pulcera information here ....
Weaving
bracelets How to make a bracelet, if you did not know how to make a bracelet today will show you the easiest way to ask these cute little woven bracelets do not know what fun it is, because until in the car was weaving and knitting ^ _ ^ now I'll tell you like I did, you will need only remnants of yarn of different colors (40 cm each), cut a circle of cardboard (thick) and start them:) just look at each little picture and see that you do so easily and quickly. Bracelets woven
bracelets How to make a bracelet, if you did not know how to make a bracelet today will show you the easiest way to ask these cute little woven bracelets do not know what fun it is, because until in the car was weaving and knitting ^ _ ^ now I'll tell you like I did, you will need only remnants of yarn of different colors (40 cm each), cut a circle of cardboard (thick) and start them:) just look at each little picture and see that you do so easily and quickly. Bracelets woven
Are Taking and my circle 8 tabs cut these tabs without the center, because in the middle Are a hole, this will help me to pass dimple my 7 threads of different colors remember to make a knot at the beginning.
Now put one by one thread in the 7-tab from the tab I start number 1 put my red thread and so on up the tab, leaving the tab number 7 number 8 wireless.
and began to knit, please note that this is our thread get out and always leaving an empty tab and I know we only have 1,2,3 sucrase thread and took the thread that plays in this case touch thread the tab number 3 (yellow line), which removed to put it into the empty tab and so we end up here
put my thread on the empty tab, the tab being number 3 now empty
far from empty tab will count 1,2,3 and this time get the tab thread number 6 by enclosing it in the empty tab, remember to always count 1,2,3 and remove the wire from putting it in the remaining
empty
pull the thread you see and put it in the empty tab
tab being empty now I'm number 6 from the 1,2,3 and pulled the thread of the tab number 1 (red wire )
and crawl into it empty, you see that is very easy:) ...
and continue weaving the desired length and so anger out on tissue below the bracelet:)
After making the desired length of your wrist will get the thread of all the tabs and bring forth all the dimple
To tie your wrist to the hand SIGTE sake what in the end of your fabric (band), leaving the interest 2 knots an inch between each node and that there will put the other end of our bracelet as seen in the photo
monear our bracelets and has said:) I hope you enjoyed it as much as I do
Pokemon Poster All 493
Arcsoft TotalMedia Theatre Platinum 3.0.1.1

Information:
maximum advantage of the PC theater experience. ArcSoft TotalMedia ™ Theatre now uses the NVIDIA ® CUDA ™ technology to bring your movies to DVD and your video in standard definition to high definition quality, thanks to SimHD ™ ArcSoft ArcSoft.
SimHD = simply makes everything in HD
"The new technology based SimHD CUDA is available in TotalMedia Theatre to not only enjoy the DVD is as close to high definition, but also other standard definition multimedia files. We are pleased to partner with NVIDIA to deliver excellence in high-definition picture on your PC. "
George Tang - Vice President and General Manager of Video and Home Entertainment Group, ArcSoft
Features: * Support
absolute reproduction Blu-ray interactive features of Blu-ray, including BD Live (Profile 2.0) (Platinum version)
* SimHD CUDA Technology approximating DVD movies to high definition to deliver extreme realism (with the plug-in of SimHD)
* Supports advanced hardware accelerated video decoding and deinterlacing
* Supports latest audio formats
* Allows output 7.1 channel audio with no loss of quality or resolution * (Platinum version)
* DTS Surround Ultra PC Certified (Platinum version)
* Direct Playback HD camcorders (Platinum version)
* Plug-in for Windows Media Center.
Size: 142 MB
>>> Download Link \u0026lt;\u0026lt;\u0026lt;
Sunday, April 25, 2010
How Much Does The Turbo Baster Cost
Platinum 3.0.1.1 Diary of a Dog
street 
also feel not abuse them: S
a sad story that is repeated constantly, hoping that this video will touch the hearts of some, and think again before a dog's take wing street, also if you can be your savior give them shelter and love for the many who are now street
Tuesday, April 20, 2010
How To Write A Will Template
COMUNICARTE MUTE GROUP OPENS NEW DUBBING


COMUNICARTE NEW COURSES OPEN WEEKDAYS.
Communicate is a Mexican company, specializing in professional training of the spoken voice and production services and audio and video postproduction.
Services:
- - COURSES, WORKSHOPS, CONFERENCES E INTENSIVE
- - VOICE OVER COMMERCIAL
- - DUBBING
- - PRODUCTION AND POST PRODUCTION IMAGE.
- - SHOOTING EVENTS.
In the area of \u200b\u200bvoice development will prepare in the following areas:
- - PERSONALITY IN THE VOICE
- - READING AT SIGHT
- - POINTER
- - DRIVING
- - DDRESS
- - DUBBING
Right now I'm opening up courses for the development of the spoken voice and the voice acting for those who want to start to enter the Mexican dubbing but with an awareness of the history and present environment, unfair competition and quality.
3 groups during the week will open in the evenings.
Group 1 Monday from 5 to 9 pm
Group 2 Tuesday from 5 to 9 pm
Group 3 Friday from 5 to 9 pm
The course is divided into three stages.
Stage 3 months (48 hours) where we will see the following.
VOICE AND DICTION
* Initial assessment of voice
* basic theoretical aspects
general* Relaxation * Relaxation
specific
* Anatomy
voice* physiology
voice
* Breathing * Control of posture
* Using resonant.
impost* correct pronunciation of vowels and consonants
* Volume, Rhythm, Pitch, Timbre, and Form Length
* Diction * Extension tone
* Voice Projection
* Integration of voice parameters
* Individual assessment of voice vocal
* Health and good use of voice. Recommendations
* Emotions and feelings through the voice.
* Characterization by voice.
* Construction of characters with the voice.
Second Stage 3 months
ACTION IN THE VOICE
* Action in the voice
*
Text Analysis * Analysis
character * Character Creation
* Applying lessons learned to develop radio programs (short radio dramas and radio comics) using Quantum Media Station as a laboratory for students.
Stage 4 months
DUBBING
* History of the Mexican dubbing
environments
* * dialing * sync script
* eyes
reactions
* * acting styles in dubbing
* environmental awareness
*cómo cobrar
Iniciará en cuanto esté armado el grupo. Solo aceptaré máximo a 6 personas por grupo, pues la idea es trabajar en estrecha interacción con cada estudiante.
Será un placer conocerte y trabajar en el desarrollo de tu voz hablada, caracterizada y actuada.
http://doblaje.wikia.com/wiki/Javier_Rivero
http://www.facebook.com/javodub?ref=ts
http:// www.cuanticamedia.blogspot.com
twitter: JAVODUB
For more write to my mail reports
javojr@hotmail.com
personally I will attend.
Attn:
THE
JAVOMonday, April 19, 2010
Tooth Pain Moves From One Tooth To The Next
ACROSS THE UNIVERSE
Hello dear friends, we travel through the universe and the history of dub in pictures ... I hope you enjoy them.
Hello dear friends, we travel through the universe and the history of dub in pictures ... I hope you enjoy them.

Rosy Aguirre chair, Mom Rosanelda Blas Aguirre and Garcia.


Subscribe to:
Comments (Atom)